Introduction
In my previous blogpost about touch handling in Android I only handled touches in simple View derived controls. But recently I was working on a custom ListView and was introduced to touches in ViewGroup derived controls which is handled somewhat differently.
Also, in the provided source code I have made the execution of the code configurable so you can experiment with touch and multi-touch on your Android phone, or the emulator if you don’t have a phone.
So, without any further ado:
Background
So, what is different
A ViewGroup derived is a control with, this won’t be a surprise, a group of child controls. As such, when touching a ViewGroup it must be decided if the event will be handled by the control itself or if it will be handled by the child controls
For this, an overridable method onInterceptTouchEvent must be implemented:
@Override
public boolean onInterceptTouchEvent (MotionEvent ev){
    // Do your stuff here
}
By choosing the return value you can make android send any future events to the child views or to the onTouchEvent method of your ViewGroup:
- return
true: Yes, you want to intercept the touchevent, meaning any following events will be delivered on yourViewGroup‘sonTouchEventmethod - return
false: No, you do not want to intercept the touchevent, meaning the child views will receive touchevents (of course only if they happen upon their surface)
In the last case, if you return false, android will continue to call your method for each new touchevent somewhere on the surface of any child of your ViewGoup derived control. So, depending on certain conditions you can always decide to stop forwarding them by return true after all.
Please read the first part of the previous sentence again: “continue to call your method for each new touchevent somewhere on the surface of any child of your ViewGoup derived control”. Thus, if you do NOT touch down on a child, your onInterceptTouchEvent will only be called once !
On the other hand, once you have returned true from the method your onTouchEvent method will be called for any future events. But for the gesture at hand, you are not able to send any touches to the child views anymore (unless you program this yourself of course). And if any child was receiving touch events it will receive an event with an action of MotionEvent.ACTION_CANCEL
Do try this at home: the code
The attached code and the github project are the code from the original blogpost Touch handling in Android
extended with new code to demonstrate the above use cases:
TouchVisualizerViewGroupActivity: the activity to show the new viewTouchVisualizerViewGroupView: a customViewGroupto demonstrate the above concepts.TouchVisualizerViewGroupChildView: a customViewwhich serves as a child forTouchVisualizerViewGroupViewto demonstrate the above concepts.TouchVisualizerViewGroupConfigActivity: anActivityto configure various properties for demonstyarting various use cases.
ViewGroup child: TouchVisualizerViewGroupChildView
This class is based upon the original TouchVisualizerSingleTouchGraphicView class to demonstrate single touches. Below I will only show what was changed to support demonstrating the new concepts:
@Override
public void onDraw(Canvas canvas) {
	// draw a border so we can differentiate the children in their parent
	// also, if we received the cancel event in the onTouchEvent method, we draw a filled rectangle
	paint.setStyle(Paint.Style.STROKE);
	if(isCancelled) {
		paint.setStyle(Paint.Style.FILL);
	}
	canvas.drawRect(0, 0, this.getWidth()-1, this.getHeight()-1, paint);

	if(downX > 0)
	{
		paint.setStyle(Paint.Style.FILL);
		canvas.drawCircle(downX, downY, getScreenSize(touchCircleRadius), paint);
	}

	// show the time left for the timeout to expire
	if(beginChild1CaptureTime != -1) {
		canvas.drawText(String.valueOf(remainderChild1CaptureTime)
			+ "?"
			+ String.valueOf(stopChild1CaptureTimeOut), 0, 10, paint);
	}
}
In the onDraw method code was added to draw a border so we can differentiate the various children in their parent ViewGroup container. At the end some code was added to show some timer values. This last point will become clear when you read on.
@Override
public boolean onTouchEvent(MotionEvent event) {
	// The usual processing here

	// We added a callback to be able to monitor the touches of the children in the parent
	if(this.touchListener != null)
	{
		this.touchListener.onTouchHappened(childId, action, event.getX(), event.getY());
	}

	remainderChild1CaptureTime =
		Math.abs(beginChild1CaptureTime - System.currentTimeMillis());
	if((stopChild1CaptureTimeOut != -1)
			&& (remainderChild1CaptureTime > stopChild1CaptureTimeOut)) {
		stopChild1CaptureTimeOut = -1;
		return false;
	}

	boolean result = false;
	switch (action) {
		case MotionEvent.ACTION_DOWN:
			// nothing changed here
			break;
		case MotionEvent.ACTION_MOVE:
			// nothing changed here
			break;
		case MotionEvent.ACTION_UP:
			// nothing changed here
			break;
		case MotionEvent.ACTION_CANCEL:
			// We now also monitor the ACTION_CANCEL event as it will
			//	get triggered in some circumstances
			isCancelled = true;
			downX = event.getX();
			downY = event.getY();
			result = false;
			break;
		case MotionEvent.ACTION_OUTSIDE:
			// nothing changed here
			break;
	}
	invalidate();

	return result;
}
Nothing spectacular here:
- We call a callback with which we can monitor the
MotionEvents send to the child control. We will use it in the parentViewGroupcontrol to see how theonTouchEventgets called once we move off the childs surface. - We calculate the timeout value enabling us to specify when to always return
falsefrom the method. - We monitor the extra action
MotionEvent.ACTION_CANCELfor which, if it happens, we set the background of the control.
Setting the timeout value is done in the configuration of the parent TouchVisualizerViewGroupView view: the TouchVisualizerViewGroupConfigActivity activity.
ViewGroup: TouchVisualizerViewGroupView
This view allows to experiment with the concepts of this article:
@Override
public void dispatchDraw(Canvas canvas) {
	super.dispatchDraw(canvas);

	interceptPaint.setStyle(Paint.Style.FILL);
	canvas.drawCircle(padding / 2, lastInterceptY, padding / 2, interceptPaint);
	canvas.drawCircle(lastInterceptX, padding/2, padding/2, interceptPaint);

	if(downX > 0)
	{
		markerPaint.setStyle(Paint.Style.FILL);
		canvas.drawCircle(downX, downY, getScreenSize(touchCircleRadius), markerPaint);
	}

	if(childDownX > 0)
	{
		Point ulCorner = getChildULCorner(childId, left, top, right, bottom);
		interceptPaint.setStyle(Paint.Style.STROKE);
		canvas.drawCircle(ulCorner.x + childDownX,
			ulCorner.y + childDownY,
			getScreenSize(touchCircleRadius + pressureRingOffset),
			interceptPaint);
	}

	if(beginReturnTrueTimeOut != -1) {
		canvas.drawText(String.valueOf(remainderReturnTrueTimeOut)
			+ "?" + String.valueOf(startReturnTrueTimeOut), 0, 10, markerPaint);
	}

	if(beginReturnFalseInOnToucheventTimeOut != -1) {
		canvas.drawText(String.valueOf(remainderReturnFalseInOnToucheventTimeOut)
			+ "?"
			+ String.valueOf(startReturnFalseInOnToucheventTimeOut), 0, 20, markerPaint);
	}
}
The dispatchDraw (yes, a ViewGroup doesn’t handle drawing the same way as a simple View neither) draws two red dots in the margin with an X and Y coordinate of the last onInterceptTouchEvent call (see below). Next, a white circle is drawn at a position set in the onTouchEvent method. Next we draw the configurable timeout values.
@Override
public boolean onInterceptTouchEvent (MotionEvent ev)
{
	lastInterceptX = ev.getX();
	lastInterceptY = ev.getY();

	this.invalidate();

	remainderReturnTrueTimeOut =
		Math.abs(beginReturnTrueTimeOut - System.currentTimeMillis());
	if((startReturnTrueTimeOut != -1)
			&& (remainderReturnTrueTimeOut > startReturnTrueTimeOut)) {
		startReturnTrueTimeOut = -1;
		return true;
	}

	return interceptTouchEvent;
}

@Override
public boolean onTouchEvent(MotionEvent event) {
	if(callBaseClass)
	{
		super.onTouchEvent(event);
	}

	if(!handleOnTouchEvent)
	{
		return false;
	}

	remainderReturnFalseInOnToucheventTimeOut =
		Math.abs(beginReturnFalseInOnToucheventTimeOut - System.currentTimeMillis());
	if((startReturnFalseInOnToucheventTimeOut != -1)
			&& (remainderReturnFalseInOnToucheventTimeOut
					> startReturnFalseInOnToucheventTimeOut)) {
		startReturnFalseInOnToucheventTimeOut = -1;
		return false;
	}

	int action = event.getAction();

	boolean result = false;
	switch (action) {
		case MotionEvent.ACTION_DOWN:
			downX = event.getX();
			downY = event.getY();
			if (returnValueOnActionDown)
			{
				result = returnValueOnActionDown;
			}
			break;
		case MotionEvent.ACTION_MOVE:
			downX = event.getX();
			downY = event.getY();
			if (returnValueOnActionMove)
			{
				result = returnValueOnActionMove;
			}
			break;
		case MotionEvent.ACTION_UP:
			downX = -1;
			downY = -1;
			if (returnValueOnActionUp)
			{
				result = returnValueOnActionUp;
			}
			break;
		case MotionEvent.ACTION_OUTSIDE:
			break;
	}
	invalidate();
	return result;
}

@Override
public void onTouchHappened(int child, int action, float x, float y) {
	childId = child;
	childAction = action;
	if(action != MotionEvent.ACTION_UP
		&& action != MotionEvent.ACTION_CANCEL) {
		childDownX = x;
		childDownY = y;
	}
	else
	{
		childDownX = -1;
		childDownY = -1;
	}
}
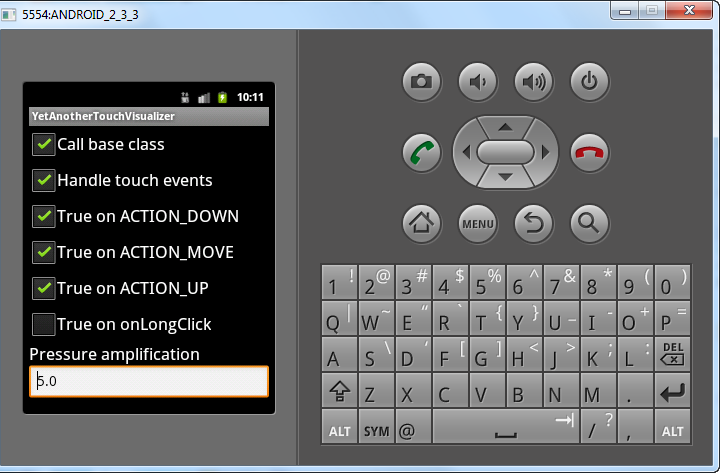
Again, as in the previous blogpost you have several configurable values allowing you to experiment with the use cases:
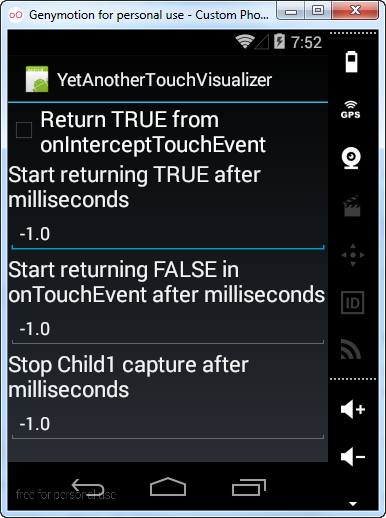
The following table maps these variables to the config setting
| Configuration | Variable | What it does |
|---|---|---|
| Return TRUE from onInterceptTouchEvent | interceptTouchEvent |
If set, the returnvalue from the onInterceptTouchEvent will always be true. If not set it will always be false. It allows testing th emost basic behaviour of this method. |
| Start returning TRUE after seconds. | startReturnTrueTimeOut |
If not -1, the onInterceptTouchEvent will start returning true after the set value. It allows testing what will happen if you switch from returning false to returning true and the coloring of the childs background shows you the MotionEvent.ACTION_CANCEL the child receives (There is a catch here: the timeou is calculated and evaluated inside the onInterceptTouchEvent method, so you must keep moving to have a correct timeout) |
| Start returning FALSE in onTouchEvent after milliseconds. | startReturnFalseInOnToucheventTimeOut |
If not -1, the onTouchEvent will start returning false after the set value. I wanted to see if I could start receiving calls of the onInterceptTouch calls again by returning false from the onTouchEvent method, but no such luck. (There is a catch here: the timeou is calculated and evaluated inside the onTouchEvent method, so you must keep moving to have a correct timeout.) |
| Stop Child1 capture after milliseconds. | stopChild1CaptureTimeOut |
If not -1, the onTouchEvent of the child will start returning false after the set value. I wanted to see if I could start receiving calls of the onInterceptTouch calls again by returning false from the onTouchEvent method of the child, but no such luck. (There is a catch here: the timeou is calculated and evaluated inside the onTouchEvent method, so you must keep moving to have a correct timeout.) |
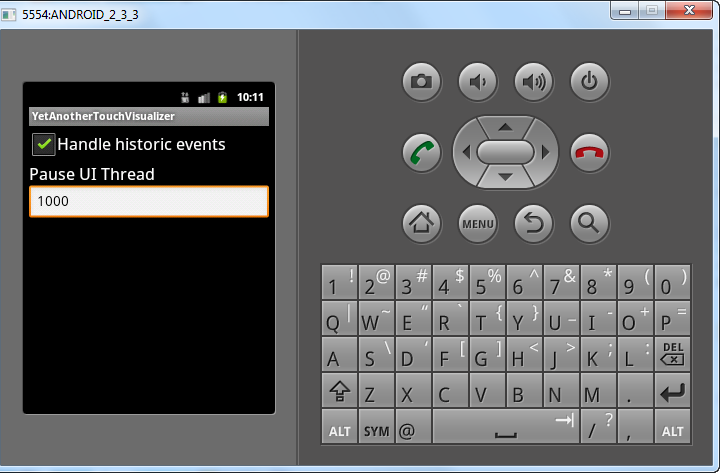
There are 2 more indicators in the view which are not configurable:
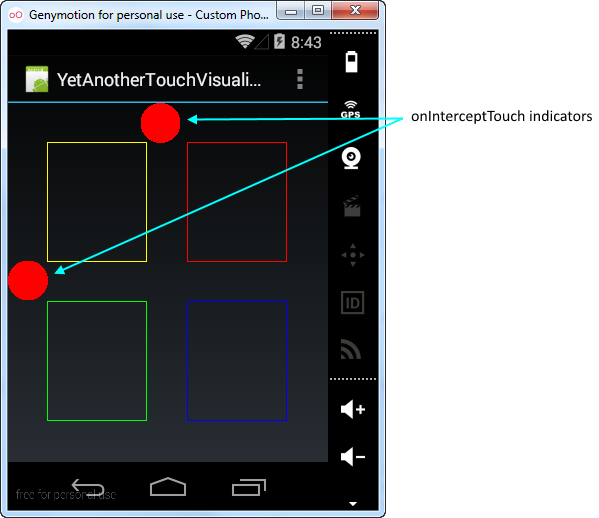
The red dots are drawn at the last coordinates received in the onInterceptTouch method. Thus, if they move you are receiving more such calls. Once they stay fixed, the method is stopped being called
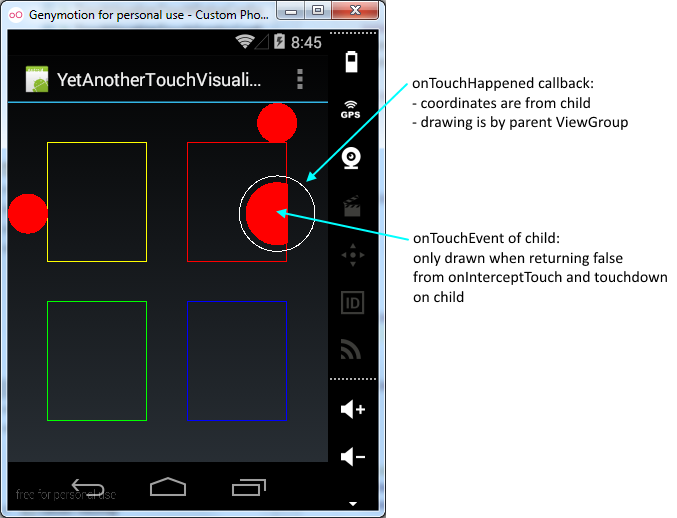
If you toch inside a child, you will also see a white ring. This ring is drawn by the parent at coordinates received from the child. If it moves it means the childs onTouchEvent method is being called. It allows to show that once you touchdown in a child but move outside its bounds, the chuild still receives touchevents.

Finally, if you touch de TouchVisualizerViewGroupView a white circle is drawn at the position you touched the view
Conclusion
Most of what is written on touch handling on the Android platform is for a regular View. With this article I wanted to provide some information on handling touches in a ViewGroup derived class and give you an app to experiment with the behaviour.